




I have recently purchased a bodice outfit. The bodice does not have closures in the front so it will need to be tied in the back each time by someone else. Do you have any recommendations on how to do this?

Corsets have been a symbol of femininity and style for centuries, and lacing them properly is key to ensuring both comfort and aesthetics.
This guide covers corset lacing styles, Lacing a Corset and accurate self-measurement for the perfect fit, and proper corset tightening and loosening techniques.
We'll also share insider tips and tricks to help you avoid common mistakes when Lacing a Corset and achieve that coveted hourglass figure effortlessly.
lacing a corset serves as a crucial determinant of a corset's fit, comfort, and overall effectiveness in corsetry.
Proper lacing ensures that the corset conforms to your body shape and evenly distributes the pressure along the laces, providing support and enhancing the desired silhouette.
It is crucial to understand the importance of lacing a corset to avoid discomfort, pain, or potential damage to your corset. Let's explore the different types of corset lacing and find the perfect one for you.
Lacing a corset is straightforward with the correct technique. Follow this simple step-by-step guide to master the process:
Step 1: Prepare your corset. Fasten the front or side closures, properly position the modesty panel, and adjust to your desired fit.
Step 2: Begin at the top. Start lacing at the top, leaving a small gap for later adjustments. Cross the laces and insert them into the opposite eyelets.
Step 3: Create the X pattern. Lace downwards to the bottom, crossing the laces to form an "X." Gently tighten to ensure even pressure and a comfortable fit.
Step 4: Adjust the tension. Starting from the top and moving down, gently pull the laces to adjust the fit. Maintain even tension, avoiding pulling too tightly to prevent discomfort.
Step 5: Tie off the laces. Once satisfied with the fit, secure the laces at the back with a simple bow or knot. Ensure they are secure but not overly tight, allowing for easy adjustment.
Video Guide: How to Lace a corset?
Step 1: Keep the laces loose at the start so you can put the corset on easily without pulling it too tight.
Step 2: Fasten the front of the corset and make sure it sits straight and secure on your body.
Step 3: Start tightening from your waist by gently pulling the bunny ears, shaping it slowly instead of rushing.
Step 4: As you tighten, guide the laces through the crisscross so both sides stay even.
Step 5: If any area feels too tight, especially around the hips, loosen it slightly and adjust until it feels comfortable.
Step 6: Once you’re happy with the fit, tie the laces into a bow at the back and check in the mirror to make sure everything looks balanced and feels right.
This is the universally accepted industry standard for authentic, structural corsetry.
The Method: The lace begins at the top or bottom and zigzags in a continuous criss-cross pattern. Crucially, at the natural waistline (often reinforced by an internal waist tape), the lacing skips a direct cross and instead feeds straight down to the next grommet on the same side, leaving two long, loose loops of cord on either side.
The Application: These loops, or "bunny ears," act as the primary pulling mechanism. Because they sit exactly at the narrowest point of the waist, pulling them draws the corset in evenly from both the top line and the bottom hem simultaneously. This method is highly recommended for underbusts, overbusts, and heavy-duty cinchers as it provides the most precise control over tension.
A more advanced variation of the criss-cross, specifically utilized to protect high-end, delicate, or high-friction materials.
The Method: Instead of the laces simply crossing over each other randomly, this technique strictly dictates that if a lace exits from underneath on the left panel, it must enter from underneath on the right panel. This creates a stack of distinct upper and lower "X" patterns.
The Application: This method ensures the laces never rub directly across the finished edges of the corset's back panels. For garments constructed of real leather, which can scuff, or fine satin, which can fray, this lacing style significantly extends the lifespan of the fabric and the structural double-stitching along the binding.
The Method: This follows the exact same pattern as the standard Bunny Ears method, but the pulling loops are positioned higher or lower than the natural waist.
The Application: This is utilized when a garment requires targeted tension adjustments. For instance, if an overbust requires more compression near the ribcage or bustline rather than the true waist, the loops are shifted upwards to anchor the tension locally.
The Method: This style relies on specialized hardware. The laces are threaded through a secondary set of sliding metal bars or leather sliders attached to the main corset panels.
The Application: By pulling just one or two central straps, the slider mechanism instantly pulls all the laces tight simultaneously. While less common in modern fashion corsetry due to the bulky hardware, it is exceptionally efficient for heavy garments or wearers who cannot easily reach behind their backs to manually adjust individual crosses.
While the traditional criss-cross and straight-line lacing styles are widely used for lacing a corset, there are plenty of creative lacing techniques that can add a unique touch to your corset.
Here are a few options of lacing a corset to replace the traditional laces:
Spiral lacing involves lacing a corset in a spiral pattern, creating a distinctive and visually striking effect. This technique provides control over tension and highlights specific body areas.
Incorporate decorative loops into the criss-cross lacing pattern for added visual interest. This technique works well with corsets that have multiple sets of eyelets.
While straight horizontal lines might look visually striking, these methods (commonly used for sneakers or light fashion bodices) are generally detrimental to real corsets.
They pull the fabric asymmetrically, creating uneven pressure that can bend steel bones permanently, rip grommets out of their settings, and cause the garment to shift off-center on the body.
To ensure a stable, uniform garment shape, the lacing gap between the two back panels must remain perfectly parallel from top to bottom.
The Ideal Gap: Measure the distance between the back panels; it should maintain an equal, consistent width of 2 to 3 inches. This parallel alignment indicates uniform tension and keeps the corset's structural lines straight.
Identifying Incorrect Gaps: Unbalanced lacing tension warps the structural lines and creates improper shapes:
Bowing Out ( ): Indicates low tension at the center (waist) and higher tension at the top and bottom.
Pinching In ) (: Indicates higher tension at the center (waist) and low tension at the top and bottom.
Correcting the Tension: To fix an unbalanced gap, adjust the bunny ears—the loops of cord on either side that act as the primary pulling mechanism. Using these loops allows for targeted tension control. Pulling the bunny ears redistributes the tension to correct bowing or pinching, restore the parallel gap, and straighten the structural lines.
You might Also Like
How Tight Should A Waist Trainer Be?- The Perfect Fit
when is the best time to wear a waist trainer ?
The Ultimate Guide to Achieving the Perfect Corset Fit.
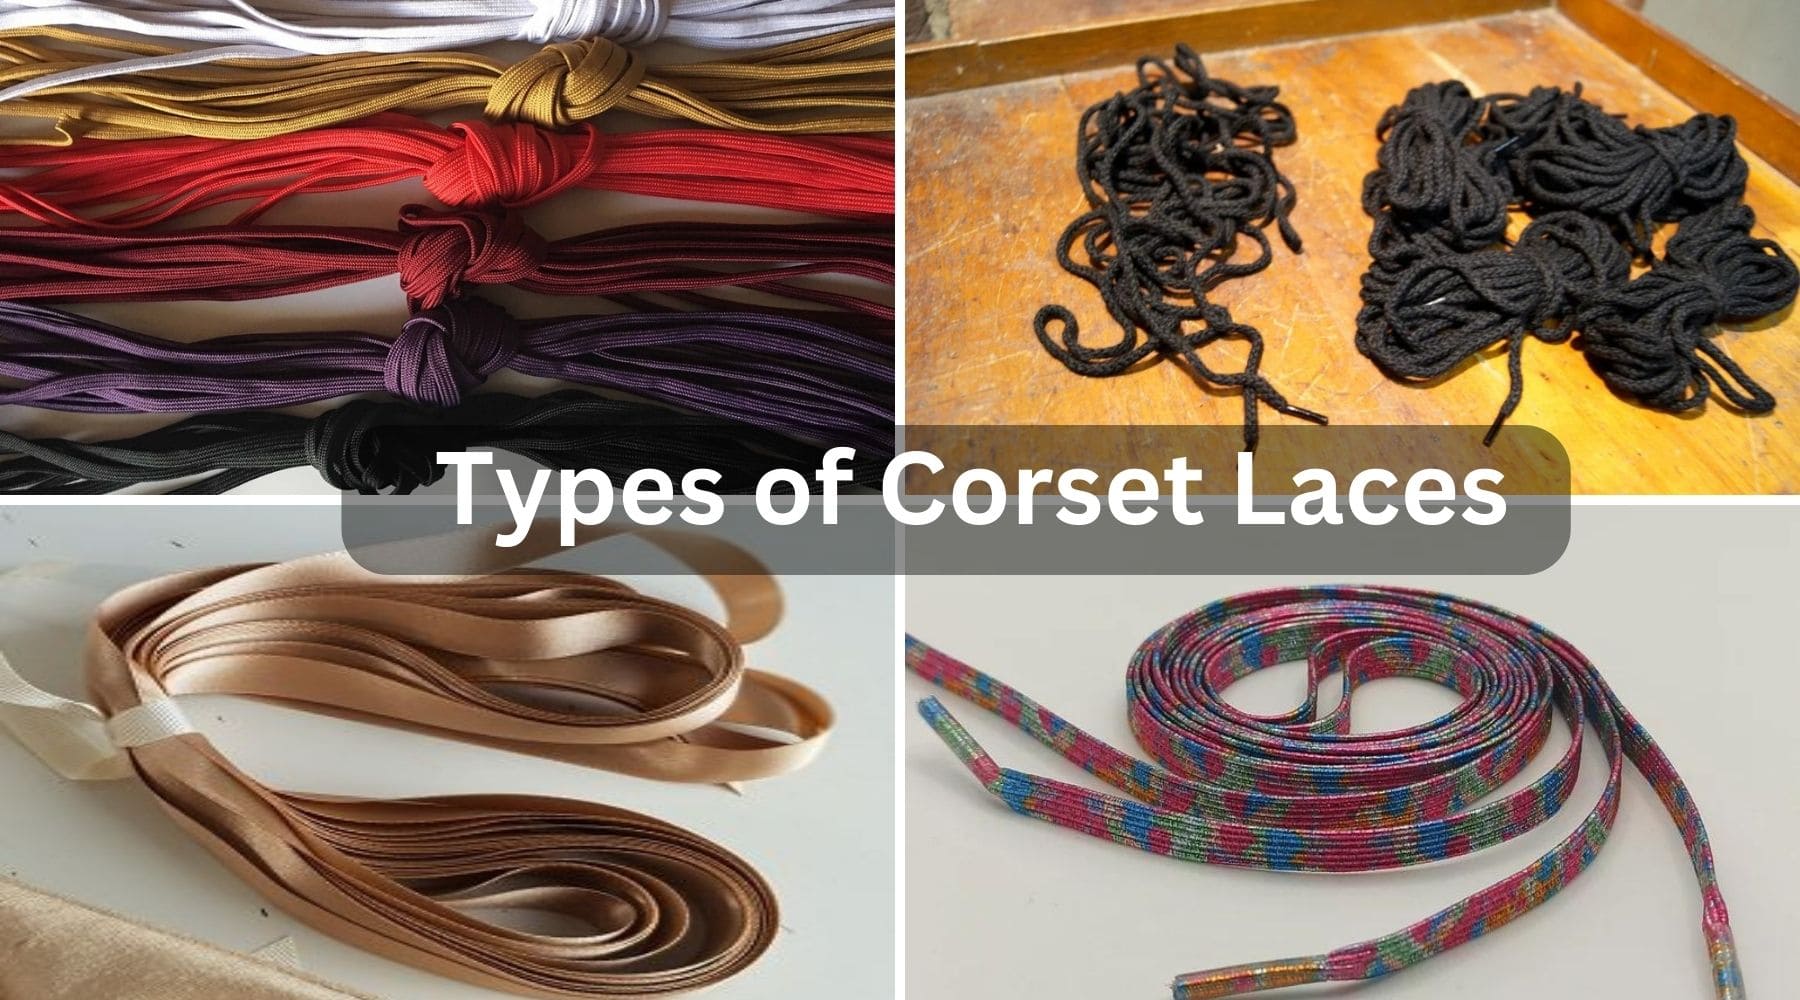
The choice of material for lacing a corset is equally significant as the lacing style itself when it comes to lacing your corset. The laces should be strong, durable, and capable of withstanding the tension required for proper lacing.
Flat Nylon or Polyester Cords: These are the strongest options, offering high friction that "locks" the crosses in place and prevents the garment from loosening during wear.
Satin Ribbon: This provides a luxurious, high-end editorial finish—perfect for professional catalog photography and product listings—but it is slippery and degrades quickly under the high tension required for daily waist training.
These versatile laces, known for their flat shape, are crafted with the finest materials, including cotton, nylon, or satin, ensuring both style and comfort in your corsetry endeavors.
Flat laces are known for their durability and smoothness, allowing them to glide through the eyelets or grommets without snagging or fraying.
Pro Tip: Try lacing a corset with these laces for even tension when tightened, ensuring a secure and comfortable fit.
Round laces, as the name implies, have a cylindrical shape. Experience the perfect combination of durability and versatility with Round laces.
Specially crafted from the robust and flexible materials of nylon or polyester, these laces guarantee strength and flexibility, ensuring a flawless corsetry experience.
Round laces offer excellent control when Lacing a corset, allowing for precise adjustments. Due to their shape, they tend to stay tied securely and are less prone to coming undone. Round laces are a popular choice for those seeking a combination of functionality and aesthetics.
3. Ribbon Laces
Ribbon laces are a fashionable option for corset enthusiasts. Typically composed of satin, silk, or other decorative materials, these laces offer a wide selection of colors and patterns to suit every preference.
Ribbon laces add a touch of elegance and can enhance the visual appeal of a corset.
Ribbon laces, while not providing the same support and tightness as flat or round laces, are often chosen for lacing a corset intended for lighter wear or for their decorative purposes.
4. Elastic Laces
Elastic laces offer flexibility and ease of use. Made with stretchable materials, such as elastic bands or bungee cords, these laces provide a comfortable fit that adjusts to the wearer's movements.
Elastic laces are ideal for corsets designed for active pursuits or occasions that require more mobility.
Remember, it's vital to prioritize the use of high-quality elastic laces for lacing a corset that are securely fastened.
This will prevent any unwanted stretching or loss of elasticity over time, ensuring a consistently comfortable and reliable fit.
Further Readings: How to Wear and Style Corsets
Lacing a corset with two laces makes it easier to control the fit. One lace tightens the top, and the other tightens the bottom. This method gives better comfort and a smoother shape.
Step 1: Separate the laces: Use one lace for the top half of the corset and the second lace for the bottom half. This helps you adjust each part evenly.
Step 2: Start lacing from the top and bottom: Start lacing the first lace from the top edge and the second lace from the bottom edge. Lace in a simple criss-cross pattern on both sides.
Step 3: Lace toward the waist: Continue criss-crossing both laces until they reach the waist area, which is the narrowest part of the corset.
Step 4: Make bunny ears at the waist: At the waist, leave extra loops on both laces. These loops are called bunny ears and are used for tightening.
Step 5: Tighten slowly and evenly: Pull the bunny ears gently, a little at a time. Make sure both sides tighten evenly. The corset should feel snug, not painful.
Step 6: Tie and secure the laces
Once the corset feels comfortable, tie the laces at the waist or tuck them neatly at the back.
Using two laces gives you better control, more comfort, and a balanced fit. Take your time while lacing, and always listen to your body for the best corset-wearing experience.
Even though lacing a corset seems simple, there are common mistakes that can affect how it fits, how comfortable it is, and how long it lasts.
Over-tightening: Pulling the laces too tight can cause discomfort, restrict movement, and put unnecessary strain on the corset. It’s equally important to find the right balance between comfort and control when lacing a corset
Uneven tension: Uneven tension in lacing a corset can result in an ill-fitting corset and an uneven silhouette. Take your time to ensure that the tension is evenly distributed across the laces.
Incorrect lacing order: Lacing the corset in the wrong order can make it difficult to tighten or adjust properly. Always follow the correct lacing order specified by the corset manufacturer or consult a reliable source.
You need to properly take care of the lacing to ensure the longevity and functionality of your corset. Here are some tips for maintaining the lacing of your corset:
Untying and loosening the laces allows the corset to relax and prevents unnecessary strain on the lacing and eyelets. This also helps maintain the shape of the corset over time.
When not in use, store your corset flat or rolled up, making sure the laces are not tightly wrapped around the corset. This helps prevent creasing and maintains the integrity of the lacing.
Check the lacing for signs of wear, fraying, or damage. Replace worn-out laces promptly to ensure the continued functionality of your corset.
Make sure you've got extra laces with you, just in case. It's always handy for emergencies or if you want to play around with different lacing materials and styles.
The proper technique of lacing a corset can make all the difference in achieving a comfortable fit, enhancing your silhouette, and embracing the timeless elegance of corsetry.
Whether you're a corset enthusiast or a curious beginner, this ultimate guide has provided you with the knowledge and techniques to lace your corset like a pro.
From understanding different lacing styles to lacing a corset and avoiding common mistakes, you are now equipped with the tools to create the perfect fit and unlock the transformative power of corsets.
So, embrace the art of lacing a corsets and let your inner beauty shine through!
A: A corset is a garment worn to shape and support the torso, usually with boning and lacing.
A: Measure your waist and choose a corset that is 2-4 inches smaller than your natural waist measurement for a snug fit.
A: Use a strong, flat, and non-stretchy lacing material, such as cotton or nylon lacing for lacing a corset.
A: Loosen the laces at the back of the corset, wrap it around your waist, and fasten the front busk or hook-and-eye closures. Make sure the corset is positioned properly.
A: Start lacing from the top and work your way down. Cross the laces over at the waist, pulling them snugly but not too tight. Continue lacing until you reach the bottom.
A: Lace the corset snugly but not excessively tight. You should be able to breathe comfortably and maintain good posture after lacing a corset.
A: No, leave a small gap (1-2 inches) at the back when lacing a corset to allow for movement and comfort.
A: Cross the laces and bring them to the front, tying a secure knot or a decorative bow.
A: Adjust the lacing whenever you put on or take off the corset. You may need to adjust it further throughout the day for comfort.
A: It's generally not a good idea to sleep in a corset. It can restrict your movement and make you uncomfortable during sleep.
A: Loosen the lacing at the back, unfasten the front closures, and carefully slide the corset off your waist.
Comments
I have recently purchased a bodice outfit. The bodice does not have closures in the front so it will need to be tied in the back each time by someone else. Do you have any recommendations on how to do this?
This is a great article!
It’s really helpful to have a step-by-step guide on how to tie a corset by yourself. It’s also helpful to have the tips on how to adjust the corset for a comfortable and secure fit. Thanks for sharing this information!